Creating an Angular Directive
In this post we will get introduced with Angular Directives. With latest Angular the Components concepts in Angular have become much simpler. Components have replaced Controllers and the Directives API as we know it in Angular 1.x. In the latest Angular we still have Directives but you can think of them as Components without views. Directives are still used whenever we need to modify the DOM directly. Directives are also primarily used in the form of HTML attributes to decorate Components with. So lets explore the Directives API by building a AutoText/Snippets directive that allows users to generate text snippets.
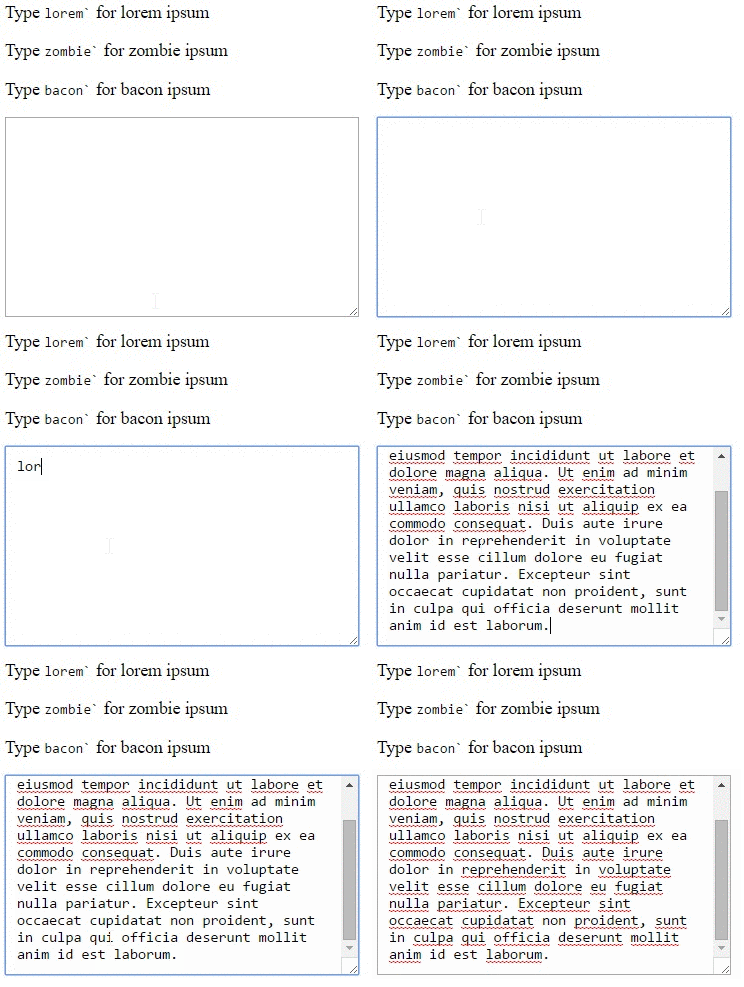
The snippet directive will allow the user to type a given keyword followed by a ` to quickly generate text in inputs. Here is an animation of what our final view would look like.

Here is a look at what our markup would look like to use our Directive on a textarea input.
<textarea [uiSnippets]="mySnippets"></textarea>Our textarea will have a Directive of uiSnippets. The uiSnippets uses the Angular property syntax [] to add functionality to our text area. We prefix our Directive to follow best practices to prevent it from collisions with existing properties on our Components. Our directive is passed in a list of snippets from our top-level Component.
import { Component } from '@angular/core';
@Component({
selector: 'demo-app',
templateUrl: 'app/app.component.html'
})
export class AppComponent {
constructor() {
this.mySnippets = [
{
name: 'lorem',
content: 'Lorem ipsum dolor sit amet, consectetur adipiscing elit, sed do eiusmod tempor incididunt ut labore et dolore magna aliqua. Ut enim ad minim veniam, quis nostrud exercitation ullamco laboris nisi ut aliquip ex ea commodo consequat. Duis aute irure dolor in reprehenderit in voluptate velit esse cillum dolore eu fugiat nulla pariatur. Excepteur sint occaecat cupidatat non proident, sunt in culpa qui officia deserunt mollit anim id est laborum.';
},
{
name: 'bacon',
content: 'Bacon ipsum dolor amet doner strip steak pastrami, hamburger sirloin spare ribs andouille. Salami drumstick strip steak ground round pork loin pastrami pancetta porchetta andouille pork chop short loin. Beef ground round t-bone shank leberkas flank filet mignon boudin meatball jowl short ribs.'
},
{
name: 'zombie',
content: 'Zombie ipsum reversus ab viral inferno, nam rick grimes malum cerebro. De carne lumbering animata corpora quaeritis. Summus brains sit, morbo vel maleficia? De apocalypsi gorger omero undead survivor dictum mauris.'
}
];
}
}So now we have our list of text snippets we can start constructing our Directive. First we are going to just get a skeleton of what our Directive will look like.
import { Directive, Input } from '@angular/core';

interface Snippet {
  id?: number;
  name: string;
  content: string;
}

@Directive({
  selector: '[uiSnippets]',
  host: {
    '(input)': 'onChange($event)'
  }
})
export class UISnippets {
  @Input('uiSnippets') snippetsList: Snippet[];
  private _snippetKeyRegex: RegExp;

  constructor() {
    this._snippetKeyRegex = /(?:^|\W)(\w+)(?!\w)`/g; // Match on given string with a following `
  }
}
Our directive imports two Decorators from angular/core. We use the Directive Decorator to decorate our Class. This lets Angular know that our Class should be consumed as a Directive. Next we define a small TypeScript interface for how our Snippet should look.
interface Snippet {
  id?: number;
  name: string;
  content: string;
}
After that we have our Directive decorator with two properties. First we have our selector. This is the name of how we would like our Directive to be named in our HTML templates. The second property is the host. This allows us to hook into the host component. The host component is the Component our Directive will be placed on. From here we can define how to hook into the host components events.
@Directive({
  selector: '[uiSnippets]',
  host: {
    '(input)': 'onChange($event)'
  }
})
In out example we want to be notified on any onChange event. Next is our Directive's Class. In our Class we create two new properties. The first is out snippetsList. This list is decorated by @input from Angular. This automatically hooks our property to catch any value passed into our directive. So our <textarea [uiSnippets]="mySnippets"></textarea> is passed in the mySnippets list from our parent Component. When the onChange event fires our Directive's onChnage method will fire receiving the event.
export class UISnippets {
  @Input('uiSnippets') snippetsList: Snippet[];
  private _snippetKeyRegex: RegExp;

  constructor() {
    this._snippetKeyRegex = /(?:^|\W)(\w+)(?!\w)`/g; // Match on given string with a following `
  }
}
The _snippetKeyRegex simply holds onto our regular expression used to match for any word with the ` at the end. Now we can start to add our functionality to our directive.
import { Directive, Input } from '@angular/core';

interface Snippet {
  id?: number;
  name: string;
  content: string;
}

@Directive({
  selector: '[uiSnippets]',
  host: {
    '(input)': 'onChange($event)'
  }
})
export class UISnippets {
  @Input('uiSnippets') snippetsList: Snippet[];
  private _snippetKeyRegex: RegExp;

  constructor() {
    this._snippetKeyRegex = /(?:^|\W)(\w+)(?!\w)`/g; // Match on given string with a following `
  }

  onChange($event) {
    if ($event.target.value.match(this._snippetKeyRegex) !== null) {
      $event.target.value = this._getValue($event.target.value);
    }
  }

  private _getValue(value: string) {
    let snippets = value.match(this._snippetKeyRegex);

    snippets.forEach(snippet => {
      value = value.replace(snippet, this._getSnippetContent(snippet));
    });

    return value;
  }

  private _getSnippetContent(snippet) {
    this.snippetsList.forEach(s => {
      if (
        s.name.toLowerCase() ===
        snippet
          .trim()
          .replace('`', '')
          .toLowerCase()
      ) {
        snippet = s.content;
      }
    });

    return snippet;
  }
}
Our Directive has a onChange($event) method that is called on the onChange event defined in our Decorator. The method takes in the value of our input. Once we have the input value we use regular expressions and a little logic to iterate through our list of snippets that is passed in and look for a match. If a snippet name is matched we replace it with the corresponding snippet's content and set the inputs value with the new text. As of RC 5 your directives will need to be registered with your AppModule. Read more about @NgModule.
The new Directive API in Angular is much simpler than what was know in Angular 1.x. See a working demo of the uiSnippet Directive here below.

