
'%3e%3cpath%20d='m222.077%2039.192-8.019%20125.923-76.671-165.115zm-53.105%20162.825-57.933%2033.056-57.934-33.056%2011.783-28.556h92.301zm-57.933-139.342%2030.357%2073.803h-60.715zm-103.102%20102.44-7.937-125.923%2084.69-39.192z'%20fill='url(%23a)'/%3e%3cpath%20d='m222.077%2039.192-8.019%20125.923-76.671-165.115zm-53.105%20162.825-57.933%2033.056-57.934-33.056%2011.783-28.556h92.301zm-57.933-139.342%2030.357%2073.803h-60.715zm-103.102%20102.44-7.937-125.923%2084.69-39.192z'%20fill='url(%23b)'/%3e%3c/g%3e%3c/svg%3e)
Building Angular CLI Projects with Github Actions
The Angular CLI provides all the built tools out of the box to create, build, and test Angular applications. In this post, we will build a continuous integration (CI) build system using Github Actions.
Our CI process will run our build and unit tests anytime we push to our repository. Using the new Github Actions feature, we can easily integrate a CI system into our Github repositories. Let's get started!
Running Angular Unit tests with Puppeteer
In our Angular CLI projects, we can build and test our entire project with just a few commands. To run these commands in our Github Actions environment, we need to add a new dependency called Puppeteer.
Puppeteer is a headless version of Chrome. A "headless" browser is a browser that does not have a visual GUI. Using Puppeteer we can run Chrome in a CI environment, which allows us to run our unit tests. To install Puppeteer to our project, we can run the following command.
npm install puppeteer --save-devNow that we have Puppeteer installed, we need to add a new configuration option to the karma.conf.js file. This new option config allows our Github Actions to run our tests with Puppeteer.
// karma.conf.js
restartOnFileChange: true,
restartOnFileChange: true,
customLaunchers: {
  ChromeHeadlessCustom: {
    base: 'ChromeHeadless',
    flags: ['--no-sandbox', '--disable-gpu']
  }
},
In our package.json file we are going to add a few new commands that will make it easier to run our CLI build.
// package.json
"scripts": {
  "ng": "ng",
  "clean": "rimraf ./dist",
  "start": "ng serve",
  "build": "ng build",
  "build:prod": "ng build --prod",
  "test": "ng test --watch=false --browsers=ChromeHeadlessCustom",
  "test:watch": "ng test",
  "lint": "ng lint",
  "e2e": "ng e2e",
  "build:ci": "npm run clean && npm run test && npm run build:prod"
},
With our new command build:ci, we can clean, run, and build our Angular CLI project with a single command. Our updated test script now runs our unit tests once and sets the appropriate browser configuration, ChromeHeadlessCustom, from our karma.conf.js file.
Integrating the Angular CLI with Github Actions
Now that we can run our unit tests in Puppeteer we can integrate our project into Github Actions. We can run CI builds by creating build scripts or "Actions" in our project. To create actions, we need to create a new directory .github/workflows/.
In our directory, we can create many new build actions, but for now, we have a single build.yml file.
name: Build
on:
  push:
    branches:
      - master

jobs:
  build:
    runs-on: ubuntu-latest
    strategy:
      matrix:
        node-version: [12.x]

    steps:
      - uses: actions/checkout@v1

      - name: Node $
        uses: actions/setup-node@v1
        with:
          node-version: $

      - name: npm install and npm run build
        run: |
          npm ci
          npm run build:ci
In our build.yml we define an action name as well as a trigger of when it should run. In this example, our action runs whenever we push to the master branch. You can configure this to run more complex scenarios like pull requests and branches. Once we define a trigger, we can define our jobs we want to run. We run our jobs using a Ubuntu Linux environment. We define our NodeJS we want to run.
Once we have our environment configured, we can define our build steps. In our example, we log out the Node version that is running then install the NPM packages for our project. Once install has completed, we then run the npm run build:ci command to build and test our project.
While this config is functional, it is slow having to reinstall our packages with each build. We can optimize our build speed by caching our NPM node_modules.
name: Build
on:
  push:
    branches:
      - master

jobs:
  build:
    runs-on: ubuntu-latest
    strategy:
      matrix:
        node-version: [12.x]

    steps:
      - uses: actions/checkout@v1

      - name: Cache node modules
        uses: actions/cache@v1
        with:
          path: ~/.npm
          key: ${{ runner.os }}-node-${{ hashFiles('**/package-lock.json') }}
          restore-keys: |
            ${{ runner.os }}-node-

      - name: Node ${{ matrix.node-version }}
        uses: actions/setup-node@v1
        with:
          node-version: ${{ matrix.node-version }}

      - name: npm ci and npm run build
        run: |
          npm ci
          npm run build:ci
We add a new step to our job that tracks our package-lock.json for any changes. If the job doesn't see any differences, then it can use the npm cache from a previous build, which speeds things up quite a bit.
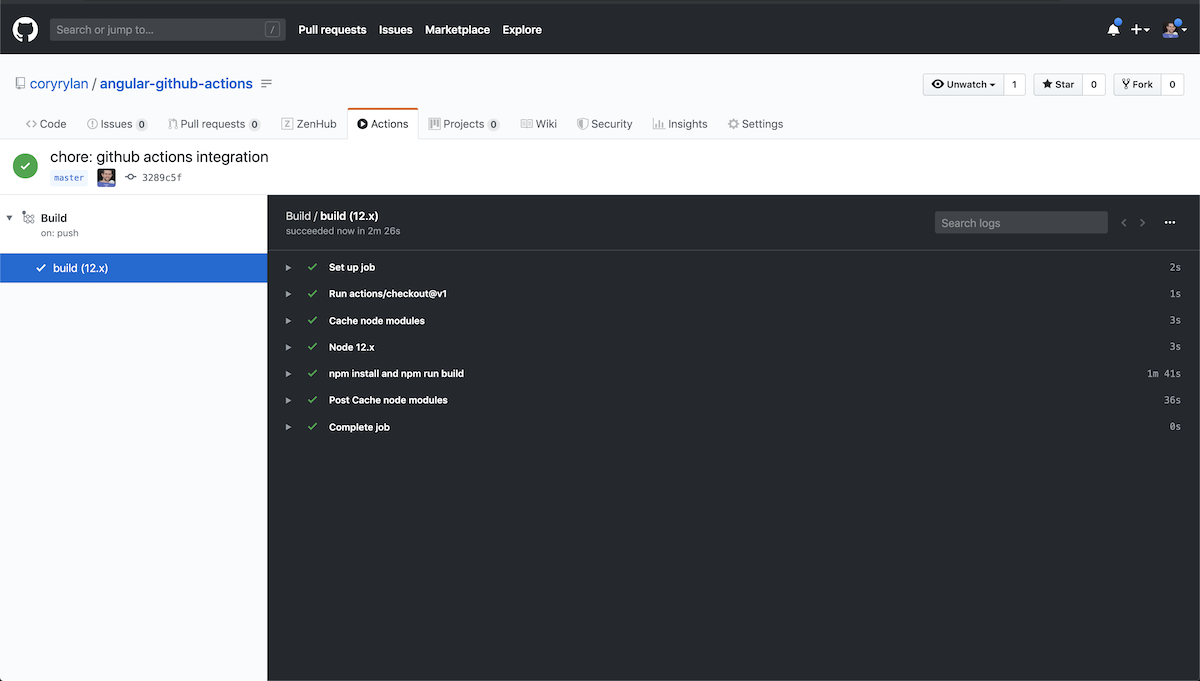
Now if we push our project, we can go to the Actions tab in the Github Repo webpage to see the status of our build.
We can also add a build status badge to our README.md project file to easily see a project build status.
To add a badge to your README.md use the following syntax:
[](https://github.com/coryrylan/angular-github-actions/actions)Using the Angular CLI and Github Actions, it has never been easier to create and test frontend Web apps. Check out the fulling working demo repo below as well as the current build status for the demo!


%20--%3e)
%20--%3e)
