
'%3e%3cpath%20d='m222.077%2039.192-8.019%20125.923-76.671-165.115zm-53.105%20162.825-57.933%2033.056-57.934-33.056%2011.783-28.556h92.301zm-57.933-139.342%2030.357%2073.803h-60.715zm-103.102%20102.44-7.937-125.923%2084.69-39.192z'%20fill='url(%23a)'/%3e%3cpath%20d='m222.077%2039.192-8.019%20125.923-76.671-165.115zm-53.105%20162.825-57.933%2033.056-57.934-33.056%2011.783-28.556h92.301zm-57.933-139.342%2030.357%2073.803h-60.715zm-103.102%20102.44-7.937-125.923%2084.69-39.192z'%20fill='url(%23b)'/%3e%3c/g%3e%3c/svg%3e)
Using Angular Forms with Async Data
Most single page apps deal with asynchronous API calls in conjunction with user input in some way. Often it's not clear how or what the best practices are when dealing with async data and forms together. In this post, we will show an Angular form with validation. With this form, we will pre-populate the inputs with async data. With this scenario, there are user experience issues we will need to address.
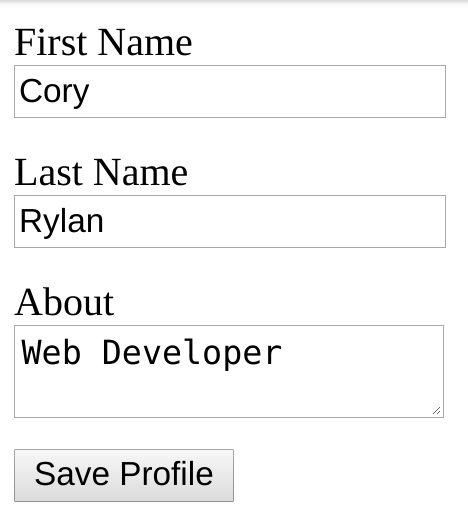
Our form will have three inputs. A first name, last name and about textarea. The first name and last name inputs will have required validators requiring the user to enter values to submit the form.
This form needs the inputs pre-populated with the existing user data. This data will be from an async data source like an API response. Our async data will come from a service UserService. First to use the Reactive Forms Module we need to import and add it to our application module.
import { NgModule } from '@angular/core';
import { BrowserModule } from '@angular/platform-browser';
import { ReactiveFormsModule } from '@angular/forms';

import { AppComponent } from './app.component';
import { UserService } from './user.service';

@NgModule({
  imports: [BrowserModule, ReactiveFormsModule],
  declarations: [AppComponent],
  providers: [UserService],
  bootstrap: [AppComponent]
})
export class AppModule {}
Once we have added the ReactiveFormsModule to our application we can start building out our Angular forms.
import { Component } from '@angular/core';
import { FormBuilder, FormGroup, Validators } from '@angular/forms';
import { Observable } from 'rxjs';

import { UserService, User } from './user.service';

@Component({
  selector: 'my-app',
  templateUrl: './app.component.html',
  styleUrls: ['./app.component.css']
})
export class AppComponent {
  form: FormGroup;
  user: Observable<User>;

  constructor(
    private formBuilder: FormBuilder,
    private userService: UserService
  ) {}

  ngOnInit() {
    this.form = this.formBuilder.group({
      firstName: ['', Validators.required],
      lastName: ['', Validators.required],
      about: []
    });

    this.user = this.userService.loadUser();
  }

  submit() {
    if (this.form.valid) {
      console.log(this.form.value);
    }
  }
}
Our form uses the FormBuilder API. Note we assign the user as a property to our component. The direct assignment will allow us to use the async pipe in our template to subscribe to our template. We will come back to the TypeScript in a bit.
Using Async Pipe and If Else Directive
In our template with the async pipe we can also use the if else condition. The if-else syntax will allow us to show a loading message until the user has loaded from our API. We don't want to show the form until the user has loaded for the best user experience. If we show the form to soon then the user could start typing before the data is applied to the inputs. If the user starts typing and then we set the form the user could frustratingly lose their work.
<!-- If user is loaded show the form, else show the loading template -->
<form
  *ngIf="user | async; else loading"
  [formGroup]="form"
  (ngSubmit)="submit()"
>
  <label for="firstname">First Name</label>
  <input id="firstname" formControlName="firstName" />
  <div
    *ngIf="form.controls.firstName.errors?.required && form.controls.firstName.touched"
    class="error"
  >
    *Required
  </div>

  <label for="lastname">Last Name</label>
  <input id="lastname" formControlName="lastName" />
  <div
    *ngIf="form.controls.lastName.errors?.required && form.controls.lastName.touched"
    class="error"
  >
    *Required
  </div>

  <label for="about">About</label>
  <textarea id="about" formControlName="about"></textarea>

  <button [disabled]="!form.valid">Save Profile</button>
</form>

<ng-template #loading>
  Loading User...
</ng-template>
Updating Forms with Patch Value
Now our form is validated correctly and only shows when the data has loaded we need to update the inputs. Let's go back and take a second look at the TypeScript for our component.
this.user = this.userService
  .loadUser()
  .pipe(tap(user => this.form.patchValue(user)));

// API Data returned has the same property names as the form control names
// making it easier to assign the form values with patchValue
// {
//  id: 0,
//  firstName: "Cory",
//  lastName: "Rylan",
//  about: "Web Developer"
// }
With our loadUser method, we are going to use a rxjs operator to chain off of the returned Observable. We are using the tap operator. The tap operator is useful for side effects or changes that don't relate directly to the returned value of the Observable. Here we are taking the value as it comes into the stream and setting our form inputs. We don't subscribe here and let the template continue to use the async pipe and if else statement to conditionally show our form.
Angular forms have two methods to update form values, setValue and patchValue. The setValue takes a value or object and maps it to each input. If the object contains a key that does not match one of the form control names it throws an error. In this example, we use the more lenient patchValue. Patch value will take any matching object key and assign its value to the same form control name but ignore properties that do not match.
Now our form is displayed when the user has loaded, and the form has its input values set. In the demo code below we have added a synthetic slowdown of two seconds to show the loading message if it were a slower network response.


%20--%3e)
%20--%3e)
