
'%3e%3cpath%20d='m222.077%2039.192-8.019%20125.923-76.671-165.115zm-53.105%20162.825-57.933%2033.056-57.934-33.056%2011.783-28.556h92.301zm-57.933-139.342%2030.357%2073.803h-60.715zm-103.102%20102.44-7.937-125.923%2084.69-39.192z'%20fill='url(%23a)'/%3e%3cpath%20d='m222.077%2039.192-8.019%20125.923-76.671-165.115zm-53.105%20162.825-57.933%2033.056-57.934-33.056%2011.783-28.556h92.301zm-57.933-139.342%2030.357%2073.803h-60.715zm-103.102%20102.44-7.937-125.923%2084.69-39.192z'%20fill='url(%23b)'/%3e%3c/g%3e%3c/svg%3e)
Creating a Dynamic Checkbox List in Angular
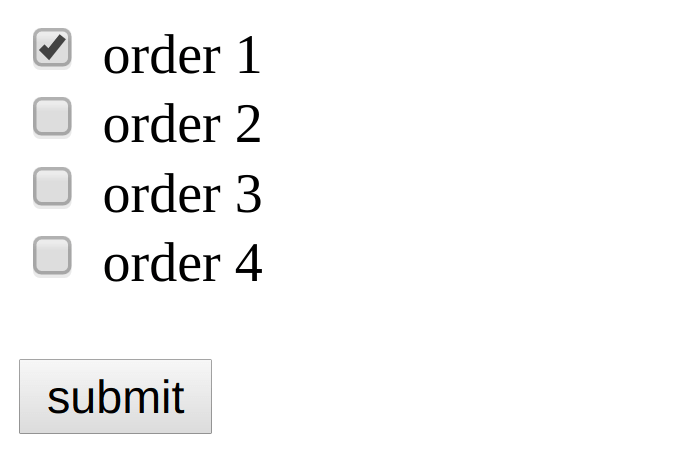
A common UI pattern for application is to have a collection of items where the user must select one too many of given items. We typically would handle this scenario with a checkbox list. In this post, we will build a checkbox list with Angular but create it dynamically from a list and add some additional validation rules. Here is what our UI will look like:
For our use case, we have a list of orders for a user to choose from. The business rules state that the user must select at least one order before being able to submit the form. Let's take a quick look at the data we are going to be using.
const ordersData = [
  { id: 1, name: 'order 1' },
  { id: 2, name: 'order 2' },
  { id: 3, name: 'order 3' },
  { id: 4, name: 'order 4' }
];
For our example, the orders object will be pretty straightforward. A real-world scenario this data would likely come from an API. With our orders list, we are going to create our checkboxes dynamically. To this, we use the Reactive Forms API. The Reactive Forms API has some excellent benefits with using Observables and Reactive programming but also has an excellent natural way to declare form inputs in our TypeScript dynamically.
Reactive Forms compose of primarily three Class types. First FormGroups which typically represents a single form. A FormGroup is typically made of many FormControls. A FormControl usually represents a single input in a form. Lastly is the FormArray. The FormArray is used to represent a collection of FormControls that are interrelated. For our example, we will use all of these Classes. Specifically, the FormArray provides an easy way to create a list of checkbox controls. The FormArray simplifies getting values of all as a collection and validate our checkbox list.
First, we are going to start with creating our FormGroup in our TypeScript and Template for the component.
import { Component } from '@angular/core';
import { FormBuilder, FormGroup } from '@angular/forms';

@Component({
  selector: 'my-app',
  templateUrl: './app.component.html',
  styleUrls: ['./app.component.css']
})
export class AppComponent {
  form: FormGroup;
  ordersData = [];

  constructor(private formBuilder: FormBuilder) {
    this.form = this.formBuilder.group({
      orders: []
    });
  }

  submit() { ... }
}
In our component, we use the FormBuilder service to create our FormGroup that we will declare in the template. This is the glue for our template to communicate with the TypeScript code.
<form [formGroup]="form" (ngSubmit)="submit()">
  <!-- our form array of checkboxes will go here -->
  <button>submit</button>
</form>
In our template, we bind our form element with [formGroup]="form". On the ngSubmit event we will log the form value. Right now our form doesn't do anything useful. We next need to add our dynamic list of checkboxes. Let's add a new FormArray to our form.
import { Component } from '@angular/core';
import {
  FormBuilder,
  FormGroup,
  FormArray,
  FormControl,
  ValidatorFn
} from '@angular/forms';

@Component({
  selector: 'my-app',
  templateUrl: './app.component.html',
  styleUrls: ['./app.component.css']
})
export class AppComponent {
  form: FormGroup;
  ordersData = [
    { id: 100, name: 'order 1' },
    { id: 200, name: 'order 2' },
    { id: 300, name: 'order 3' },
    { id: 400, name: 'order 4' }
  ];

  get ordersFormArray() {
    return this.form.controls.orders as FormArray;
  }

  constructor(private formBuilder: FormBuilder) {
    this.form = this.formBuilder.group({
      orders: new FormArray([])
    });

    this.addCheckboxes();
  }

  private addCheckboxes() {
    this.ordersData.forEach(() => this.ordersFormArray.push(new FormControl(false)));
  }

  submit() {
    const selectedOrderIds = this.form.value.orders
      .map((checked, i) => checked ? this.ordersData[i].id : null)
      .filter(v => v !== null);
    console.log(selectedOrderIds);
  }
}
In our example we loop through each order and create a new FormControl instance. With each control we create we push the new control onto our orders FormArray. We set the first control to true, so the first item in our list is checked.
The form array treats each checkbox as part of a collection of controls. The FormArray creates an easy to use API to set the value and check the validation of the entire collection instead of having to iterate through each FormControl. Next, we need to wire up the orders FormArray to the template.
<form [formGroup]="form" (ngSubmit)="submit()">
  <label formArrayName="orders" *ngFor="let order of ordersFormArray.controls; let i = index">
    <input type="checkbox" [formControlName]="i">
    {{ordersData[i].name}}
  </label>
  <button>submit</button>
</form>
In our template, we defined a checkbox that we iterate over with *ngFor. On the label, we also define formArrayName="orders" to tell the form API which controls belong to the FormArray. On each checkbox, we give it a control name which in this example is just the index of the loop. Now when Angular instantiates this form each checkbox with be wired up to our form, we declared in the TypeScript code. If everything is connected correctly you should see something like this:
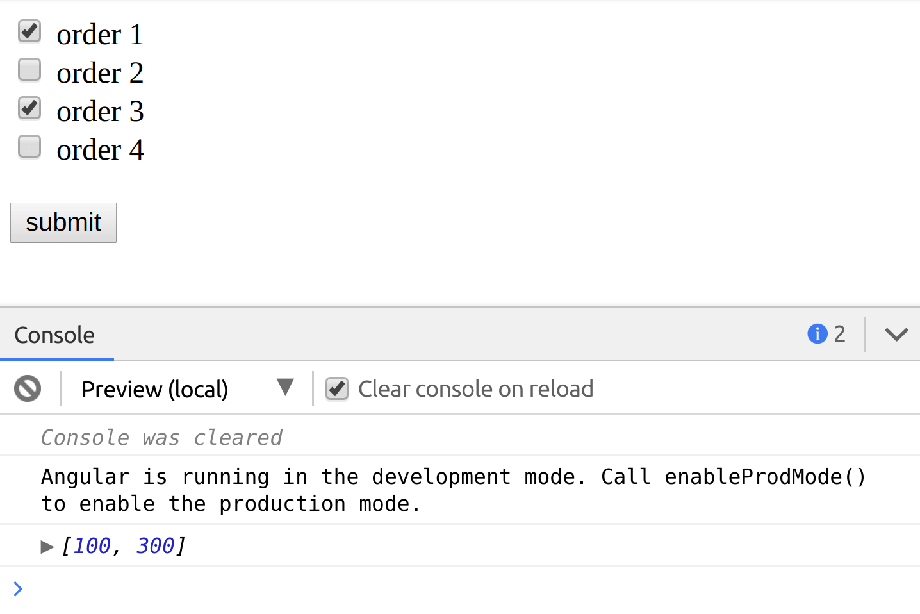
Now the checkbox list is working the way we expected. We are almost done but remember earlier we said there would need to be some validation. Our validation rules stated the user must check at least one item before being able to submit the form. Next, we are going to add custom validation to our checkbox list.
Checkbox Validation
Let's take a look at the template to see how we can validate that at least a single check box is selected.
<form [formGroup]="form" (ngSubmit)="submit()">
  <label
    formArrayName="orders"
    *ngFor="let order of orderControls; let i = index"
  >
    <input type="checkbox" [formControlName]="i" />
    {{ordersData[i].name}}
  </label>

  <div *ngIf="!form.valid">At least one order must be selected</div>
  <button>submit</button>
</form>
In our template we do two things; first, if the form is invalid, we show a message to notify the user they must check at least one item. Second (optional , we disable the form button if the form is invalid. Next, in the TypeScript, we need to write a validator function.
...
export class AppComponent {
form: FormGroup;
ordersData = [...];
constructor(private formBuilder: FormBuilder) {
this.form = this.formBuilder.group({
orders: new FormArray([], minSelectedCheckboxes(1))
});
this.addCheckboxes();
}
...
}
function minSelectedCheckboxes(min = 1) {
const validator: ValidatorFn = (formArray: FormArray) => {
const totalSelected = formArray.controls
// get a list of checkbox values (boolean)
.map(control => control.value)
// total up the number of checked checkboxes
.reduce((prev, next) => next ? prev + next : prev, 0);
// if the total is not greater than the minimum, return the error message
return totalSelected >= min ? null : { required: true };
};
return validator;
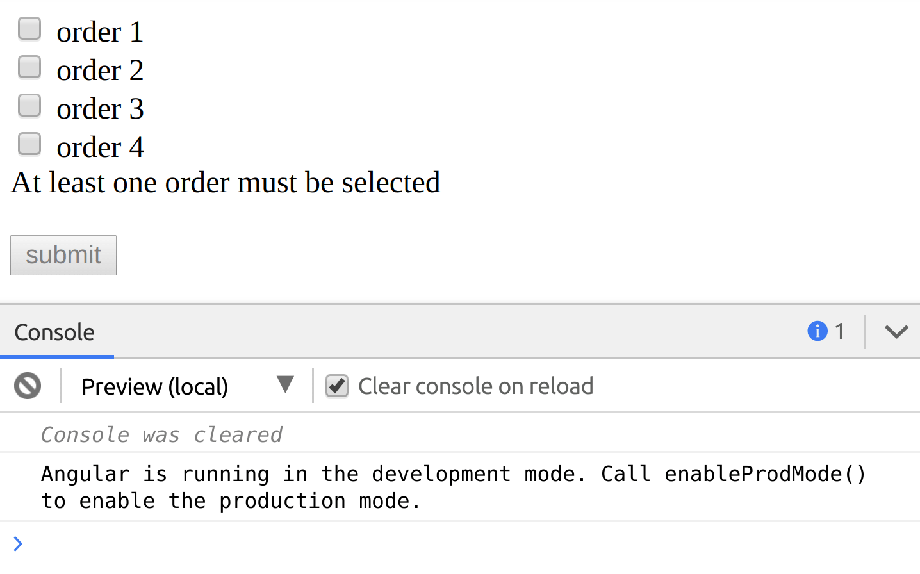
}In our form we pass a second parameter to our FormArray, the minSelectedCheckboxes function. The minSelectedCheckboxes function is our
validator that will check that at least n checkboxes are selected. To accomplish this, the function is a factory function that creates a new validation function based on the number of minimum required checkboxes you pass in. This enables us to have a flexible validator that can validate to say a minimum of two or three checkboxes. Now if we look at our template, we can see our validation at work.
Async Form Controls
Now that we have a dynamic check box list working with validation you might be running into issues if you data for your checkboxes is asynchronous or coming from an API request. Next we will refactor our example to handle async form controls.
import { Component } from '@angular/core';
import { FormBuilder, FormGroup, FormArray, FormControl, ValidatorFn } from '@angular/forms';
import { of } from 'rxjs';

@Component({
  selector: 'my-app',
  templateUrl: './app.component.html',
  styleUrls: ['./app.component.css']
})
export class AppComponent {
  form: FormGroup;
  ordersData = [];

  get ordersFormArray() {
    return this.form.controls.orders as FormArray;
  }

  constructor(private formBuilder: FormBuilder) {
    this.form = this.formBuilder.group({
      orders: new FormArray([], minSelectedCheckboxes(1))
    });

    // synchronous orders
    this.ordersData = this.getOrders();
    this.addCheckboxes();
  }

  private addCheckboxes() {
    this.ordersData.forEach(() => this.ordersFormArray.push(new FormControl(false)));
  }

  getOrders() {
    return [
      { id: 100, name: 'order 1' },
      { id: 200, name: 'order 2' },
      { id: 300, name: 'order 3' },
      { id: 400, name: 'order 4' }
    ];
  }

  submit() {
    const selectedOrderIds = this.form.value.orders
      .map((v, i) => v ? this.ordersData[i].id : null)
      .filter(v => v !== null);
    console.log(selectedOrderIds);
  }
}

...
We have refactored and moved the orders into a getOrders method so we can call it in a synchronous and asynchronous way. We can now simulate an async request for our orders by using the RxJS operator of(). The of() operator will emit a single event value for us. We can subscribe to this value and then use it.
import { of } from 'rxjs';
...
constructor(private formBuilder: FormBuilder) {
  this.form = this.formBuilder.group({
    orders: new FormArray([], minSelectedCheckboxes(1))
  });

  // async orders (could be a http service call)
  of(this.getOrders()).subscribe(orders => {
    this.ordersData = orders;
    this.addCheckboxes();
  });

  // synchronous orders
  // this.ordersData = this.getOrders();
  // this.addCheckboxes();
}
...
Going back to our constructor we can mimic the async call if we were getting our data for an HTTP request. We subscribe to the value and then pass the orders back into our addCheckboxes just like before. Now our checkbox list is created via async data and still fully functions and validates.
Check out the full running example demo in the link below!


%20--%3e)
%20--%3e)
