

Testing Screen Readers with Web Test Runner Voiceover
Cory Rylan
- 4 minutes
To properly understand how screen readers work to low/no vision users, the best way to test is to use the screen reader yourself. This can make testing for accessibility (a11y) on the Web time-consuming. When building on the Web, we want to ensure our UIs are constructed to support screen readers.
While this typically is a manual process, once we understand how the screen reader will work, we can create automated test suites. These test suites can ensure we don't introduce regressions or notify us when there is a browser bug. In this post, we will learn how to use the @web/test-runner test runner and the web-test-runner-voiceover plugin to create automated regression tests for our UI.
For Mac users, VoiceOver is the OS-provided screen reader and is often paired with Safari or Chrome. You can try out VoiceOver by pressing Command-F5 VoiceOver enables users to navigate via keyboard commands and read aloud the intent and details of the UI.
Setup Web Test Runner Voiceover
The web-test-runner-voiceover package is a plugin to @web/test-runner that allows us to write tests for our UI via VoiceOver.
To get started, we will create a minimal test configuration for our project.
// web-test-runner.voiceover.mjs
import { playwrightLauncher } from '@web/test-runner-playwright';
import { esbuildPlugin } from '@web/dev-server-esbuild';
import { voiceOverPlugin } from 'web-test-runner-voiceover';

export default /** @type {import("@web/test-runner").TestRunnerConfig} */ ({
  concurrency: 1,
  concurrentBrowsers: 1,
  files: ['./src/**/*.spec.js'],
  testsFinishTimeout: 60000,
  testFramework: {
    config: { timeout: '60000' }
  },
  browsers: [playwrightLauncher({ product: 'webkit', launchOptions: { headless: false } })],
  nodeResolve: true,
  dedupe: true,
  plugins: [
    voiceOverPlugin(),
    esbuildPlugin({ ts: true, json: true, target: 'auto', sourceMap: true })
  ]
});
This basic config will run our spec.js files which will contain our VoiceOver tests. Before we can start writing our tests, we need to adjust some permissions on our Mac. For the test runner to interact with VoiceOver programmatically, we need to enable the following steps:
- In
VoiceOver Utilityapp, check "Allow VoiceOver to be controlled with AppleScript" - Enable Terminal app in
System Preferences=>Security & Privacy=>Privacy=>Accessibility. - Allow Terminal/VoiceOver permissions if prompted
- If Dictation prompt is opened, dismiss, click don't ask again.
The plugin will automatically adjust VoiceOver preferences for optimal testing speed. The tests should run in a full browser and not a headless browser. VoiceOver cannot read headless browsers.
Creating a Test
To create our first test, we will need to test a scenario manually using VoiceOver to understand what we should expect the default behavior to be. Then, once we are satisfied with the behavior, we can create a test to prevent any regressions.
import { expect } from '@esm-bundle/chai';
import { VoiceOverTest, Commands } from 'web-test-runner-voiceover/browser';

describe('should enable voice over tests with inputs', () => {

});
The Web Test Runner supports many different testing libraries. In this example, we are using Chai. To interact with the test server to communicate with VoiceOver, we will import VoiceOverTest and Commands.
import { expect } from '@esm-bundle/chai';
import { VoiceOverTest, Commands } from 'web-test-runner-voiceover/browser';

describe('should enable voice over tests with inputs', () => {
  let element: HTMLElement;

  beforeEach(async () => {
    element = document.createElement('div');
    element.innerHTML = `
      <input aria-label="first name" placeholder="first name" />
      <input aria-label="last name" placeholder="last name" />
    `;
    document.body.appendChild(element);
  });

  afterEach(() => element.remove());

});
For our test, we will keep it simple and verify that VoiceOver can properly read aloud the labels of our form. In the beforeEach, we create our form and aterEach remove it. This will ensure a clean example between each test.
import { expect } from '@esm-bundle/chai';
import { VoiceOverTest, Commands } from 'web-test-runner-voiceover/browser';
describe('should enable voice over tests with inputs', () => {
let element: HTMLElement;
beforeEach(async () => {
element = document.createElement('div');
element.innerHTML = `
<input aria-label="first name" placeholder="first name" />
<input aria-label="last name" placeholder="last name" />
`;
document.body.appendChild(element);
});
afterEach(() => element.remove());
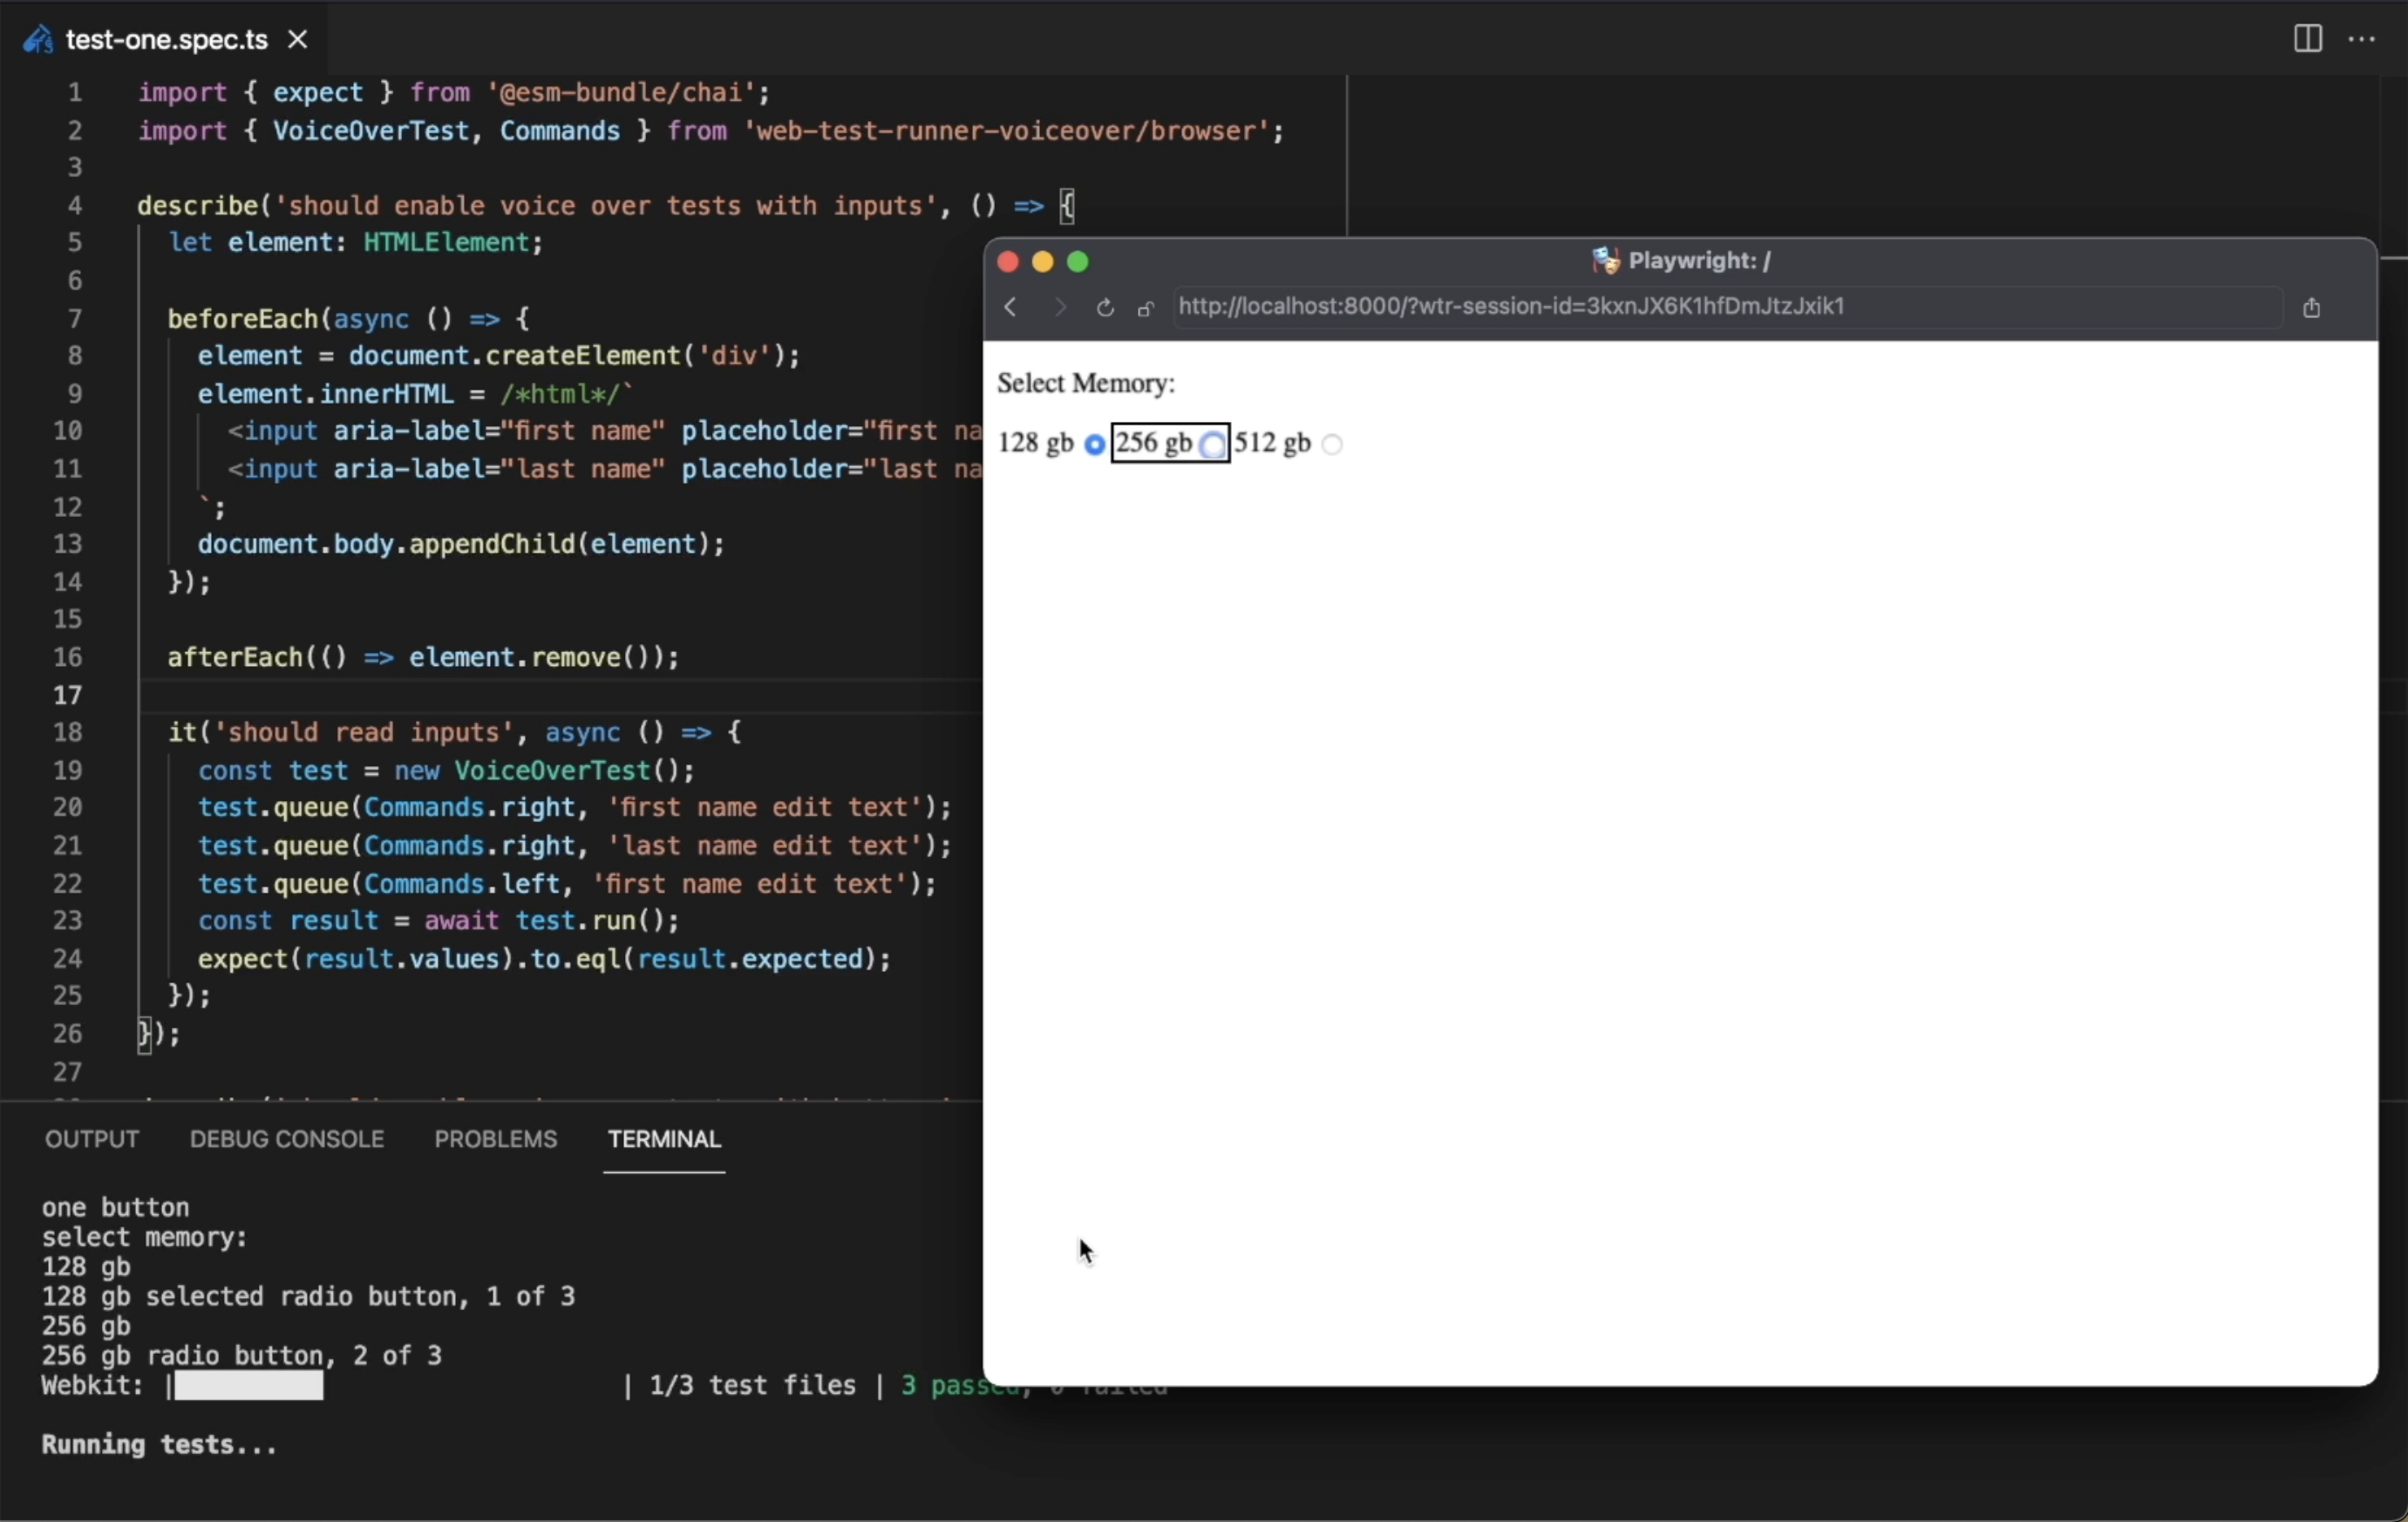
it('should read inputs', async () => {
const test = new VoiceOverTest();
test.queue(Commands.right, 'first name edit text');
test.queue(Commands.right, 'last name edit text');
test.queue(Commands.left, 'first name edit text');
const result = await test.run();
expect(result.values).to.eql(result.expected);
});
});To create our test, we instantiate a new VoiceOverTest. For each keyboard command we want to use, we call test.queue() with the command and the expected result from VoiceOver. Once we have our queue setup we call test.run().
Run will send our command queue to the test server, having VoiceOver execute the commands natively in the OS. Once VoiceOver has processed our commands, the test server will send back the read output from VoiceOver. Once we have the result, we can compare that what VoiceOver read is what we expected for our test.
The tests should not run in parallel but one at a time. This ensures VoiceOver accurately reads the page content. Currently, tests do not work on Github CI due to container permission issues. To allow the tests to run locally and skip during a CI build on Github, you can add the following NPM script.
"scripts": {
  "test": "node -e 'if (!process.env.GITHUB_ACTION)process.exit(1)' || web-test-runner",
},
Web Test Runner is a fantastic way to write modern JavaScript tests and a rich plugin API. Using web-test-runner-voiceover, we can help ensure our applications are accessible and remain accessible.


%20--%3e)
%20--%3e)

'%3e%3cpath%20d='m222.077%2039.192-8.019%20125.923-76.671-165.115zm-53.105%20162.825-57.933%2033.056-57.934-33.056%2011.783-28.556h92.301zm-57.933-139.342%2030.357%2073.803h-60.715zm-103.102%20102.44-7.937-125.923%2084.69-39.192z'%20fill='url(%23a)'/%3e%3cpath%20d='m222.077%2039.192-8.019%20125.923-76.671-165.115zm-53.105%20162.825-57.933%2033.056-57.934-33.056%2011.783-28.556h92.301zm-57.933-139.342%2030.357%2073.803h-60.715zm-103.102%20102.44-7.937-125.923%2084.69-39.192z'%20fill='url(%23b)'/%3e%3c/g%3e%3c/svg%3e)