

Angular Development with Visual Studio and Windows
Angular is quickly gaining popularity in the Microsoft and .NET world. With the cooperation of the Angular Team from Google and the TypeScript team from Microsoft a lot of developers have given both sides a second look at the new technology stacks. This post will cover the setup work for the Angular tooling and development experience with Visual Studio.
With the proliferation of so many new tools around the JavaScript community it can be overwhelming coming from a integrated solution stack such as .NET and Visual Studio. Microsoft has been hard at work creating support for the new advanced tooling in Visual Studio making it a very powerful IDE for front end web development.
So in this blog post we are going to cover a few key steps in getting up and running with Angular and Visual Studio.
- Downloading the latest Visual Studio
- NodeJS integration with Visual Studio and Windows for front end development tools
- Task Runner integration such as Gulp, Grunt and NPM scripts
- TypeScript compilation and intellisense support
- Basic project structure with .NET Core and traditional folder based structures
Visual Studio
Visual Studio has had a long history of versions and editions. For modern web development I recommended to use the 2015 edition. Within the 2015 edition there are varying levels of cost based on Enterprise features and team size. The most popular edition is Visual Studio Community. This version is a full fledge IDE that is free to use for education purposes and small development teams. The community edition includes everything thing we will need for a modern development experience with Angular. For this post this is the version we will use, but the rest of the post could be applied for other editions as well.
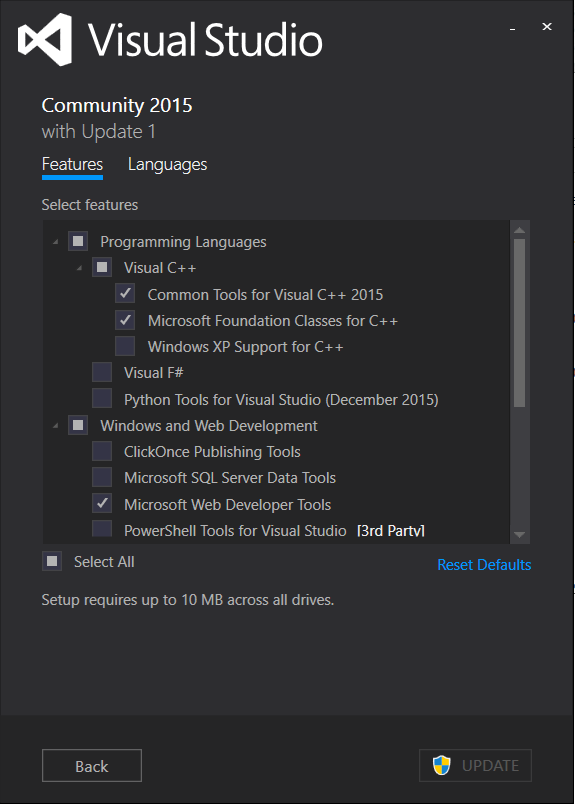
So our first step would be to download Visual Studio Community. Before installing STOP and read this next section. Visual Studio has many different features and support for a variety of platforms. When installing there are two things we will want to check first during the install. First we need to check the Visual C++ option. This will help us later when us ng NodeJS on windows. We will come back to why this is important. Second we will select the Microsoft Web Developer tools. Both of these will give us the basics needed in Visual Studio for Angular development.
Installing Visual Studio should not mess with any previously installed NodeJS instances.
Ok now you can go download the latest Visual Studio here. Make sure to also have
Update 1 installed before continuing. Visual Studio Community Download.
NodeJS and Visual Studio
Modern web development and NodeJS go hand in hand. Almost all modern web development tooling is built on top of NodeJS. If you are not familiar with NodeJS it is a JavaScript runtime that we can use to create JavaScript development tools and servers.
Visual Studio comes with a pre-installed version of Node. This is for convenience but is likely to get in your way. We will want the latest version of on our machine. This fine grained control is important because this allows our projects to rely on a set version of Node we can control that is not tied to Visual Studio. This is really important on large teams with build servers and multiple development environments. There are two major versions of NodeJS. I recommend using the latest 5.x branch. The 5.x barnch is very stable and includes the latest features. NodeJS Install.
Ok, now that we have Node installed, we need to adjust Visual Studio to use the local Node version that we just installed to our machine. In the top right corner type in the quick launch "External Web Tools". You should get a dialog like this.
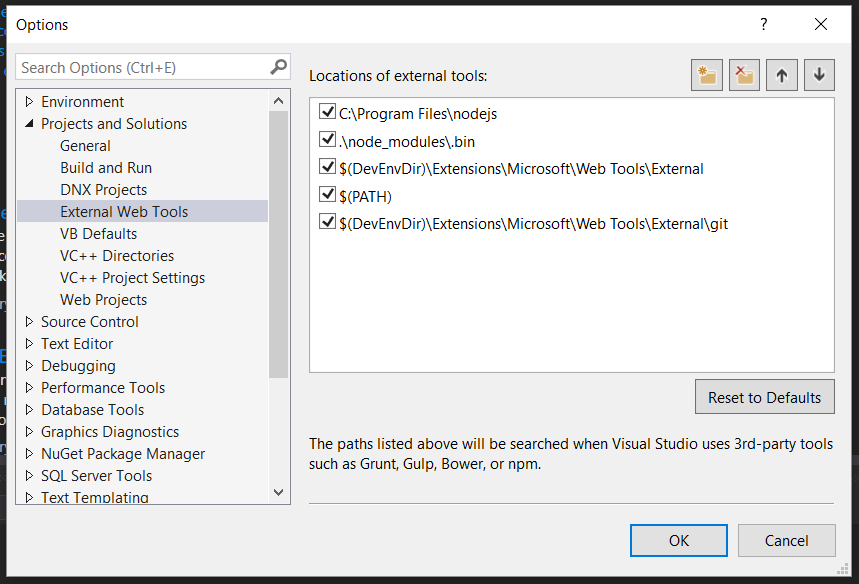
Make sure the top two entries are like the entries depicted above. This will force Visual Studio to point to the NodeJS we installed on to our machine. Now when we update Node on our machine Visual Studio will use that version and not the one tied to the Visual Studio.
NodeJS and Windows Gotchas
Now, if you remember, earlier we installed a C++ option with our Visual Studio version. There are for certain NodeJS packages that rely on native C++ compilers. Until recently on Windows the only way to get those C++ compilers was to install Visual Studio. Now there is a separate C++ compiler that is in technical preview. This can be handy if you need the C++ compiler for a machine that you don't want Visual Studio on like a build or testing server that is running Node.
The next step for allowing Node to use the .NET C++ compiler is to install Python. This is a dependency for Node and the C++ compiler to communicate using a cross platform module called node-gyp.
- Install Python 2.7.x
- Add it to your PATH,
npm config set python python2.7 - Run
npm config set msvs_version 2015 --globalin the cmd line
You can find our more information and debugging tips on GitHub.
Another gotcha is running older versions of Node and NPM. Older versions of Node and NPM (Node package manager) organized package dependencies in a deeply nested tree like structure. On Windows this causes issues since there is a limit of how many nested folders you can have. This causes issues with moving and deleting our installed Node modules. The new versions of NPM now use a flat folder structure to get around Windows shortcomings. So just make sure you run updated version of Node(v4 or v5) and NPM (v3). To check what version of NPM you are running just run the following in your command line: npm -v. You can read more about this issue here.
Task Runners
Task runners such as Gulp, Grunt, and NPM scripts allow us to define a set of commands that we can run to manage our projects tasks. These tasks can range from compiling Sass or Less to CSS or compiling our TypeScript to JavaScript. These tools all have their own pros and cons, but I won't get into what task runner you should use or if your project even needs one. That is something to research and determine what is best for your project and team. I will cover how these command line based tools easily integrate into Visual Studio.
These Task Running tools are all command line based. This makes them easy to use and easy to integrate into editors and IDEs. If these tools are used in your project, Visual Studio will automatically recognize them and add a task runner explorer to the bottom of the IDE. These common task runners will run on the version of Node that is installed on your machine and is not tied to the Visual Studio version you are running.
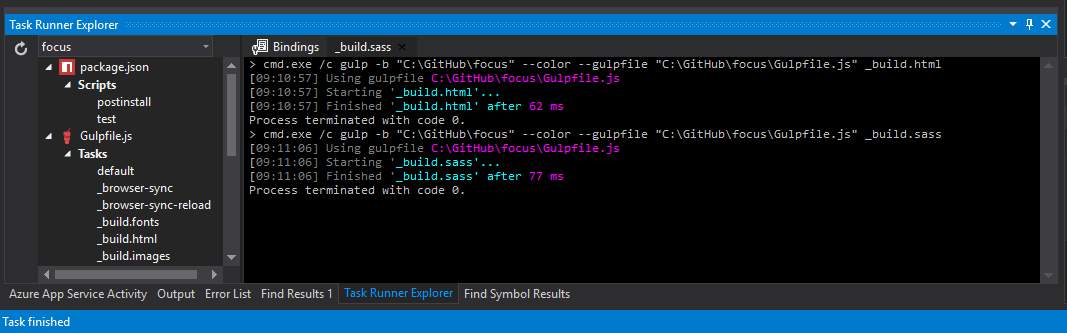
Grunt and Gulp support is included automatically. To add NPM script support you can download the extension here.
TypeScript
Angular (versions greater than 2.x) is written in TypeScript and encourages its use in development. Visual Studio has excellent TypeScript support with intellisense and the latest features. To get the latest TypeScript version install the extension here. It is ideal to run the latest version as this is what Angular usually uses. Install TypeScript for Visual Studio
Building with TypeScript
There are a few different ways to build your TypeScript code. Visual Studio can build it for you in the IDE. I do not recommend this. Once you need to build your project on another machine like a build server you won't want a dependency on Visual Studio. If you are using a build system of some sort like Grunt or Gulp or anything else you can easily use the TypeScript command line tool. You can download this tool via NPM [here](https://www.npmjs.com/package/typescript . This will allow you to compile your TypeScript with almost any build system.
One thing to note: if you compile your TypeScript outside of Visual Studio, make sure to keep the version in Visual Studio close to the same version as your build task. This will help make sure that any new language features are both in the IDE and build step.
Visual Studio recognizes and supports the new Typings tool. This tool is a way to easily download TypeScript type definitions of libraries that give Visual Studio improved intellisense to our projects. Visual Studio also recognizes TypeScript definition files from node modules installed in the project.
Project Structure
I am not going to dig into details of how an Angular app should be structured as this will change as the Angular community determines what the best practices are. I will simply cover the two main ways to open and or run a Angular app in Visual Studio. The first technique is Folder based and the second is .NET Core Solution based. If you do not need any .NET dependencies, which is likely if building a pure Angular app, then you can use the folder structure.
Folder Based
A folder structure simply means our website lives in a single top-level folder with no .NET references or solutions. This is simply a folder with our TypeScript and other static resources. This is the most simple set up and leaves you open to any number of Angular starter projects and templates.
To open an Angular app by folder, select File > Open > Website. This will simply open the folder and files in Visual Studio. You can then use any local server of your choice, whether that be Browser Sync or a simple HTTP Server. If you want a quick localhost you can right-click in Visual Studio and select "View in Browser" and this will create a IIS Express site for your app.
.NET Core
The new .NET core can work with Angular. Using Angular with .NET core means slight adjustments in your application structure. Your compiled TypeScript will need to be bundled and moved into the wwwroot folder along with any other static files such as HTML and CSS. This is where .NET core serves static files. To read more about .NET Core check out dotnet.github.io.
For tutorials of Angular and .NET Core set up I recommend checking out the following:
- Angular and ASP.NET Core - A Webcast by Shawn Wildermuth.
- Angular BareBones by Dan Wahlin
- Routing in Angular with ASP.NET Core by Nicolas Bello Camilletti
As .NET Core and Angular stabilizes there will be more community driven start-up projects and templates for these two technologies. Until then it's up to us to connect the dots.
Conclusion
Visual Studio can be a powerful IDE but also can be overwhelming especially with all the new JavaScript tooling being introduced. If your Angular
project is not tied to .NET I recommend taking a look at Visual Studio Code a new lightweight editor from Microsoft.
Visual Studio Code can now support .NET core apps without the need of Visual Studio.
If you do rely on .NET for you app then focus on learning Angular and the tooling for it before
trying to integrate into a .NET stack. This will go a long way in learning how Angular works without a IDE getting in the way. Please feel free to comment and let me know of any additional steps or tips that can be added.


